I am slightly obsessed with cloth diapering. But, before I get into that, let me update you. It's been a long process, often discouraging, but I am well on my way now. My homestudy was approved a couple of weeks ago and I should be matched very soon. I am doing an embryo adoption, and believe me, that has nothing to do with a desire to be pregnant! I actually was quite content with the idea of adopting an infant and never experiencing pregnancy. But God put it on my heart that all the frozen embryos leftover from IVF are babies who need a home and deserve life. Anyway, the genetic families will look over my profile and make a decision on whether they think I will be a good match for their embryos, and all of this is supposed to occur within the next two weeks, then we move into all the legalities and paperwork. Fortunately, all of that is managed by the agency and all I really need to do is sign on the dotted line.
So, anyway, moving on to cloth diapers. I wrote a post a while back about the fitted diapers I made. I used the Rita's Rump Pocket pattern (which is "one size fits most"), but instead of pocket diapers, I made fitteds. This was based on a suggestion she had made on her blog, and also on another one-size fitted pattern that claimed to be able to fit newborns through potty-training. Prefold diapers are traditionally 4 layers thick on the sides and 8 layers thick in the middle (4x8x4), and it was the same with the one-size fitted pattern. I modified the RRP by taking off the front wings (from reading the blog, the front wings were a big problem, and they are not at all necessary) and adding sewn-in inserts, making it a 2x8x2 fitted diaper. I also made the Rita's Rump Cover true to the pattern (or so I thought, but I used 2 layers of regular fleece and later realized I had misinterpreted the pattern and she used a thinner fleece for the inner layer). Then, I made one-size prefolds from T-shirts per fernandfaerie.com. I made a few flatfold diapers from flannel.
I started collecting old T-shirts several years ago for eventual diaper-making, and I finished making my initial diaper stash over a year ago. Now, as motherhood looms over my horizon, I have been doing a lot of experimenting with my diapers, testing absorbancy, and practicing different folds. There are several things I wish I had done differently with my diapers:
Covers: I wish I just had never bothered to make these covers. I began to regret it shortly after I finished them. I think they may be too thick to actually really be useful to me. And, they will not fit a baby probably until after 3 months old. Now, when I made them, the creator of the pattern states that they will not fit a newborn, so I knew that in advance. I thought I would either make them work, or use a different cover in the newborn stage. But they seem really big and I suspect they will not fit until at least 6 months. At any rate, 2 layers of fleece over a thick diaper just does not seem like a winning combination. But I have them, and they are cute, and I am going to try them out.
Fitteds: I thought fitteds would be easy and convenient. No pockets to stuff, just put the diaper on and then stick a cover over it. Pretty simple for a babysitter to use, right? Well, first off, they really do take forever to dry. Now, all my internet research prepared me for them to take a long time to dry. Except that I thought "a long time" was a longer drying cycle or maybe even two cycles. I fully plan to get a new (well, new to me) washer and dryer when baby gets here, but I thought my current dryer was stellar and efficient until I started pre-washing my diapers. After 3 rounds in the dryer, they have to be hung to finish drying. Hopefully a bigger dryer will alleviate some of that. But, secondly, the diapers have a lot of bulk. I didn't think it would really be a problem since I had visited the other website (which no longer exists) where the woman had made the one-size fitteds and folded them to fit a newborn. Realistically, I can use flats in the newborn stage and my fitteds should be fine by 3 months, although they will be a little on the bulky side. But, in cloth-diapering, bulk comes with the territory. Also, I used a lot of donated flannel, flannel I already had or was leftover from other projects, and clearance flannel, but I also bought a good amount of flannel (on sale, of course) and probably could have done it cheaper. And, the diapers are still super cute, and hopefully easy for sitters to use.
Prefolds: Yeah, I love my T-shirt prefolds. It takes 2 shirts per diaper, and I decided I wanted 24, so I did have to go buy some shirts at thrift stores. The key here is to make sure to buy large and XL so that you can cut an 18" square out of the front and back, and buy the cheapest 100% cotton shirts you can get. Men's undershirts make absolutely fabulous diapers. So very soft, and thin but still absorbent. I used them for the middles. Say I had 2 blue shirts. That makes one blue diaper, because you get four 18" squares, and you put 2 together and fold them in half, then overlap that on the other 2 (just look at fernandfaerie.com to figure out what I am talking about). But if I only had one blue shirt, I would do one layer blue, and one layer undershirt, and fold it to where the blue was on the outside, then put the pieces together so that the whole diaper is blue. So, I only ended up with two diapers that were made completely out of those fabulous undershirts. T-shirt prefolds can be bulky as well, but it is less of a problem than the fitteds, and they don't take as long to dry, although they still take a while. The ones made only from undershirts have very little bulk and are more similar to the prefolds you would order online. I got a little excited when shopping for shirts to make diapers, and I spent $2 each on some of the shirts, which would come out to $4 for one diaper. Yeah, that is a much bigger per-diaper price than I wanted to pay. On the other hand, many of the shirts I used were free, so for my entire stash, the price averages out to much less. I still wish I would have been more conservative in my shopping!
Flatfolds: Flannel. I made my flats out of flannel. Super cute flannel. In these past few days, I have been looking at flatfold diapers online and they run roughly $2 each. I did get my flannel on sale, but I may have spent more than $2 on some of the ones I made. They will be good diapers, but I could have done it much cheaper, and they are thicker than they necessarily need to be, which I think will be good for some applications and more inconvenient for other applications. I did not really think about making them out of anything else. Once I did think about this, I made one out of a cotton pillowcase that had been donated to me back when I was collecting diaper materials. A lot of people use flannel for flats, but all the manufacturers of flats and gurus of the cloth diapering world put a lot of emphasis on thin materials for flats. So, it probably won't hurt to have a combination. Flats are very versatile and can be folded to fit any size, as well as be used as doublers and for many other purposes (they also are very easy to wash and dry). With that in mind, I am getting very big into flatfold diapers right now. I have 14. I want more. I have some old flannel sheets that I have long planned to eventually make diapers out of. But, I decided to go hunting in thrift shops today for old cotton sheets anyway. Now, I see lots of benefits for using old cotton sheets to make diapers: they have been well-used and washed many, many times. How soft they are now is how soft they will be. No guesswork about whether or not the fabric will soften. Also, it gives a great insight into how well the fabric will hold up to abuse. So, I went to a local thrift shop and took a look around. The pillowcases were 50 cents each, and I know I can get one diaper out of each pillow case and have fabric left over. I found some pretty luxuriously soft cotton pillowcases. I bought about 13 pillowcases and a king-size flat sheet made of combed cotton. I only picked things that felt nice and soft and that were made of strong fabric that shows no sign of weakening after countless washes. Do I need that many diapers? Nope. Did I essentially spend 50 cents each on 13 diapers that would cost me about $24 per dozen online? You bet. And, I expect to get many diapers out of my $2 king-size sheet. Not to mention, I still have the old flannel sheets to turn into diapers. I've heard it said that cloth diapering is addicting. I am justifying my addiction. Point A: I may have multiples. In fact, many people are predicting that I will have multiples. Point B: logic dictates that the more diapers I have in my circulation, the less wear and tear each diaper will have, which means I can pass them on to someone else when I am done. Point C: everyone else is doing it.
Tuesday, February 11, 2014
Saturday, December 8, 2012
Yo-yo quilt 1 year update

Wednesday, October 24, 2012
Today my adoption coordinator called so that we could talk about my home study. It was so good to talk to her for the first time and I asked a lot of questions and got a lot of information and feel better informed about the information I need to provide. The home study toolkit is a 15-page document full of information, checklists for the documents I need to provide, etc, but the person who emailed it to me told me that I would need to speak with my adoption coordinator before filling it out because there were things I needed to know about the form. Which, of course, turned out to be true, such as when listing my employment history, I need to explain any gap in employment for one month or longer. Good to know, because I had lots of gaps during both times that I was in college.
I also discussed with her that I had been denied by CPS in 2008, and the reasons that they cited for denying me. She double-checked with the home study coordinator and confirmed that those reasons would not affect my home study with them. While we were talking I learned that going through an agency is a whole lot easier than CPS! My fears and hesitancies are now resolved. They are not nearly as nitpicky and do not require so much stuff! I have a fire and environmental checklist that my home has to meet, but there won't be health inspections and fire inspections, etc. CPS was a whole lot of work. I still have to provide a lot of the same documents that I provided to CPS but there are a lot of roadblocks with CPS that are not roadblocks with my agency.
So what has to happen now is that I have to gather all the documents for my home study file, and as soon as that is done and they have the results of my background check, it will be only a couple of days before the home study coordinator will contact me to schedule my home visit. Then it is straight on to the matching process!
I do need to find somewhere to store my desktop computer and desk while I am still living in the apartment. I am planning to move into a house when my lease is up in July, but for now the computer desk is blocking the window in my bedroom, and the fire safety requirements dictate that the window not be blocked. So if anyone wants to let me stash it in their house or in their garage until next summer, let me know! I also have to make a Last Will & Testament. I think those 2 things, the computer desk and the will, are going to be the biggest things to get done. Everything else should be pretty simple and pretty easy.
Now let me tell you what my dog, Fiyero, did while I was at work yesterday. You know how I posted a pic of the baby bottles to collect change in? Well, every day when I am gone, my dog opens the door to the baby room. I don't know what he does in there, I usually can't find anything wrong. Well yesterday, I found something. I had set all of those baby bottles, in the package, on the bed. Just so you know, the room is full of boxes of stuff for my garage sale and some of those boxes are blocking the bed. So I don't know how he did it, but all of the bottles were out of the package and they were all still on the bed. The actual bottles were intact, but the nipple rings had been removed from every bottle and were well-chewed. There is no sign of the silicone nipples. We are talking 7 bottles. The bottles were not chewed. There was not a single bottle that still had the nipple ring on, and not a single nipple ring was unchewed. And no nipples, not even pieces. 7 silicone nipples were removed from the nipple rings and disappeared without a trace. Impressive, I know. No one can ever say that Fiyero is not thorough!
Monday, October 15, 2012
I'm on my way!
So, I called Children's Connections, Inc. today to see if they received my adoption application. They just got it today although I mailed it a week and a half ago. Apparently Lubbock is in a different country! Anyway, I am so excited. They don't call it an application, they apparently call it a "service initiation agreement" so when I called to ask if they received my application they transferred me to HR thinking I was talking about a job application. So that was a little confusing. But they did receive my service initiation agreement today, and then sent me an email with some more information.
I am learning that the average person does not understand the adoption process very well. There is a lot that happens before you are matched with a baby. The requirements vary somewhat among agencies, but you have to apply with the agency and undergo a background check. A homestudy is required for all adoptions in Texas. What is a homestudy? Well, a social worker comes to your home and interviews you in depth about everything. Your home life, your finances, your childhood, your plans for the future, your relationships with your family and friends, your health, etc. This includes financial documents, budgets, debts and assets. Depending on the agency you are using, you may have to attend counseling sessions, take classes, have health and fire inspections of your home, provide letters from your doctor, etc. Once you complete all the requirements and have an approved home study, you wait to be matched, which can still take some time.
I am so excited. I already am assigned to an adoption coordinator, who should be getting in touch with me in the next couple of days, and I received another email with my home study toolkit. So now I am going to read through that! Yay!
Saturday, October 6, 2012
Scentsy, etsy, and more!
Well, this week I mailed off my adoption application with my first payment!!! I am so excited that I can hardly believe it's real. Now I will be going into full-fundraiser mode, doing paperwork, preparing for my homestudy, etc.
I am doing a Scentsy & Grace Adele fundraiser, which goes through Oct. 27th. You can order from my Scentsy party online here and as soon as I have a link for the Grace Adele party, I will post it.
I am also doing a garage sale to raise funds for my adoption on Nov. 3rd here in Bryan/College Station. If you live around here or in Houston and would like to donate your junk for me to sell, please let me know! The only way this will be a success is if I have a lot of stuff to sell. Also, if you would like to help with the sale that weekend that would be greatly appreciated! (And I have decided to bribe helpers with chocolate chip cookies.)
I do have an etsy store and am working to make more things to post for sale. Right now it is mostly stethoscope covers. I am working on hats, scarves, holiday placemat & napkin sets, and crocheted toys, all in time for Christmas, so check for updates.
In the meantime, help me spread the word and gain support for my adoption!
Thanks and gig 'em!
~Elizabeth
Saturday, September 22, 2012
DVD Mobile
Last year for Christmas, I converted all of our family's home movies to DVD. Twenty-something years worth of home movies translated into 50 DVDs, and I made a set for my parents, myself, and each of my 3 siblings, which totaled 250 discs. (If you want to do this, buy a little device on Amazon called easyCAP. It is dirt cheap, around $8, but you will have to read the reviews in order to learn how to use it because the instructions that come with it are worthless. You will notice that more than half of the reviews are horrible; those reviews are from the people who did not read the other reviews and thus could not work it. Read the good reviews from the computer gurus, it will be well-worth your time. Once you figure it out, it is super easy to use! One review said it did not work on Windows 7 64-bit, but that is what I have and it worked swell! You do need a lot of space on your hard drive for the capturing, it uses about 1 GB/minute of video for the capturing, but once you save it as a movie through Windows Movie Maker, it will only be 3-4 GB, and then you can delete the raw footage.)
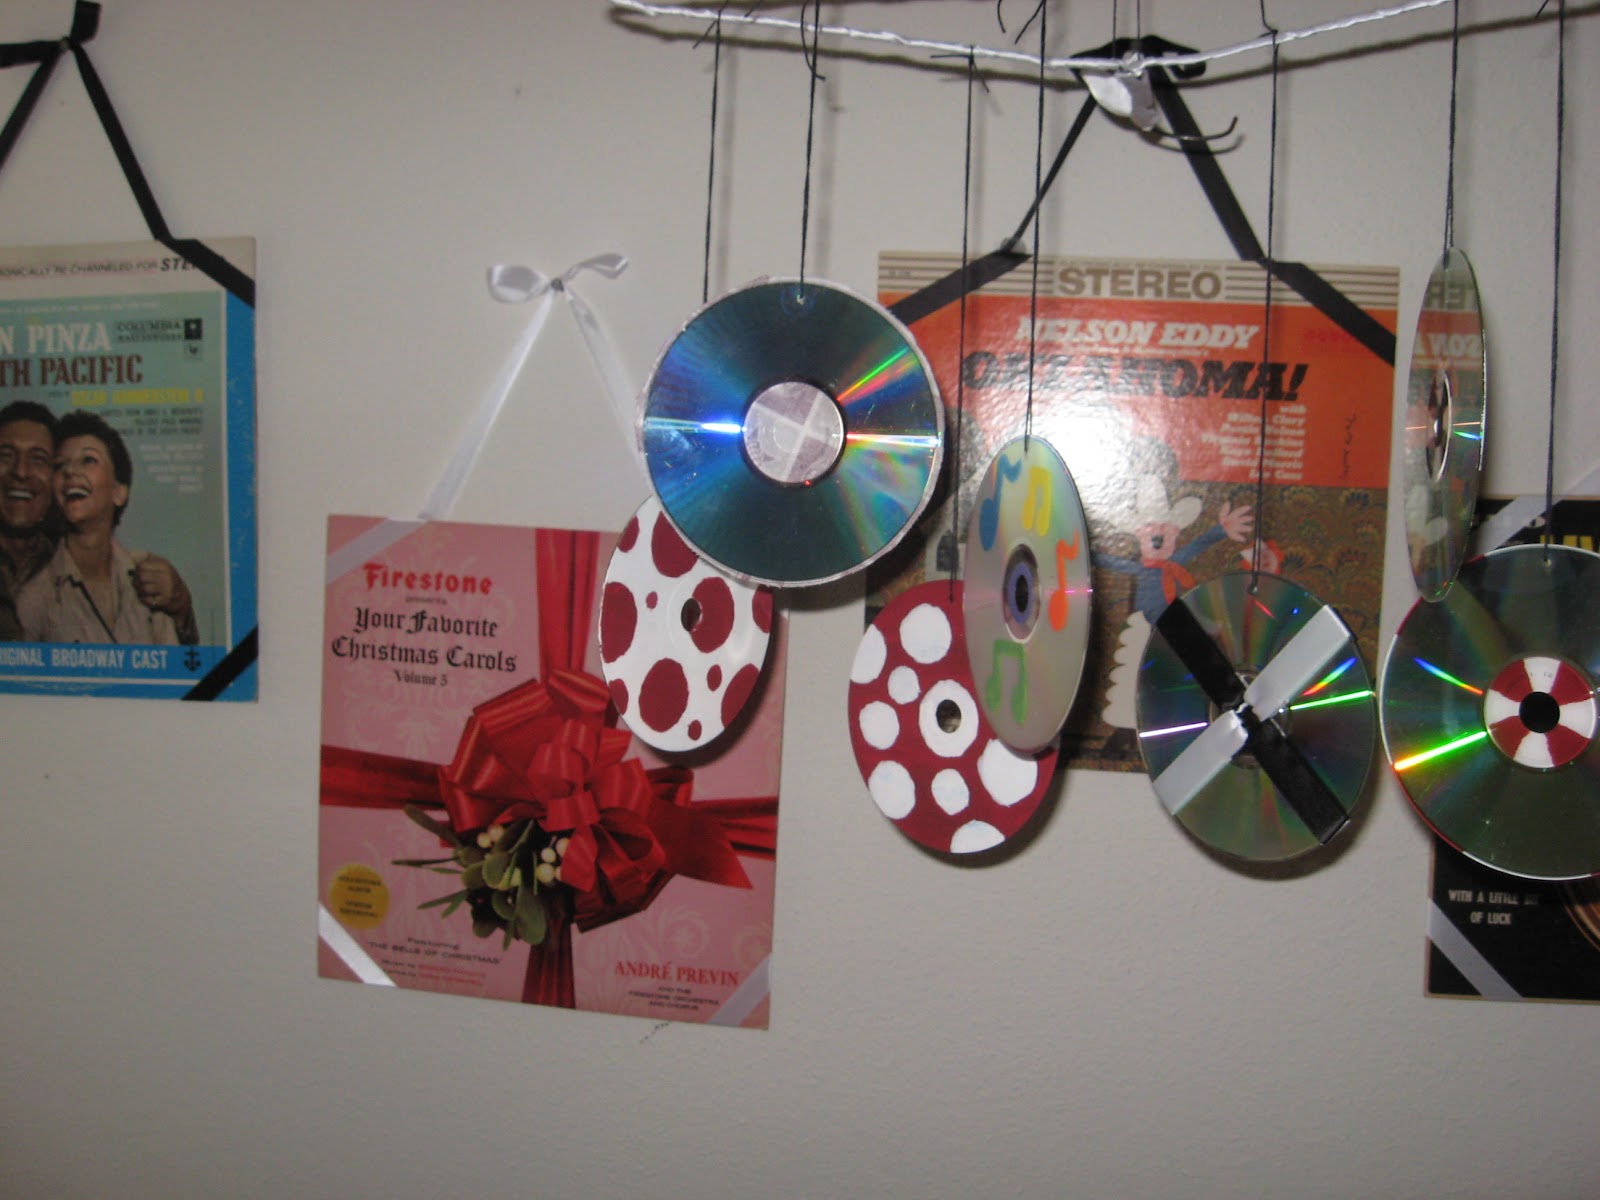
If you have ever burned a DVD, you know that errors sometimes occur and render the DVD unplayable. If you are making 250 DVDs, you end up with a whole lot of unusable discs. I have a hard time throwing away something if I think I can come up with a use for it. We all have plenty of coasters made out of nonworking discs, and I have quite a collection of coasters as it is, so I needed something different. The internet was not much help. Yes, if you google it, you will find all sorts of creative and elaborate uses for old discs, but none of these ideas appealed to me, except there were many mobiles pictured. None of the mobiles were my style, but nevertheless I decided to brainstorm a mobile that would be my style!

The result is my baby mobile. I decorated the discs in various ways, and had my friends decorate a few, too. High-contrast is very stimulating to babies, so several of the discs are painted black & white or maroon & white (we have to begin instilling the Aggie spirit at an early age!). I glued squares of black & white fabrics on some of the discs. Babies are also stimulated by bright colors, and my nursery's theme is "music & musicals," so some of the discs are painted with music notes in bright colors. The reflections of light off of the discs is also stimulating so the backs are left blank, and I have a few discs that I glued together so that the shiny sides are facing out, and I added ribbon to these.

The next step is to drill a hole near the edge of each disc for hanging. I used cotton crochet thread to tie the discs to a hanger (for lack of anything better to use and for the purpose of being economical). I then tied the hanger at three points so that it could be hung from a hook on the ceiling. I have it hanging over my changing table, and, in my opinion, it looks spectacular. When the fan is on, the air turns the discs and creates a nice effect. I have additional discs that I am going to use on a play gym that I got secondhand and all the toys are missing. They will be too high to touch but stimulating to look at and reach for. I am sure I will come up with more uses before all is said and done.
Friday, September 21, 2012
Update & Fundraisers
Wow, sorry I haven't posted in a while! I have been picking up an extra shift each week so I can make money for my adoption! I am very excited, but all the working is keeping me super busy and not giving me much time to rest. At least I have a good reason for doing it :-).
I am working on going through all my stuff to get ready for an adoption fundraiser garage sale. I live in an apartment, so if anyone would be willing to let me have my garage sale at your house, let me know! I have an offer to use a friend's house in Houston, but that is a little far for hauling stuff and setting up the day before, etc. I also am accepting donations of stuff to sell, as well as help to get everything set up and priced and help running the garage sale.
The other fundraiser I am doing is collecting change. To anyone who would like to collect their change for me, I will give you a cute decorated baby bottle that says, "Baby Bossert adoption fund" for you to collect your change in!
If you would like to be a part, but live far away, some ideas of how you could help are:
1. Donate through my blog
2. Have a garage sale on my behalf and donate the money
3. Sell your junk online and donate the money
4. Pray!
I really appreciate everyone who is supporting me in this endeavor!
I am going to get some sleep now because I have to be up at 4 for work, yikes.
Thanks and gig 'em!!!
Elizabeth

Friday, September 7, 2012
Cloth diapers

For my cloth diaper stash, I am making fitteds, flats, and prefolds. I completed the fitteds a few months ago and thought I would share them with you. The diapers I made are "one size fits most," and I used Rita's Rump Pocket as the basis and got some of my inspiration from a one-size-fits-all fitted diaper pattern that I can no longer find online (the site no longer exists). Rita's website shows her pocket diaper on both a 3-month old and a 2.5-year old. One of her suggestions is to make the diaper with a sewn-in insert, and since the other one-size pattern I found has even more layers but claims to fit a newborn, I decided to go for it.

I printed off her pattern, enlarged to the correct size, and taped it together. From reading Rita's blog, I learned that the front wings cause problems with wing droop, and she suggests folding in the wings on the completed diaper. I decided to fold in the wings on the pattern, thus eliminating front wings from the completed diaper, especially since they are not important to the fit of the diaper. I traced a rectangle onto cardstock to use as a template for the sewn-in insert. The cardstock square you see is a template I made a long time ago, the center is an 8" square and the outside is a 12" square. I used the 8" square for my cloth wipes.

And then I wondered how to do a sewn-in insert without the stitching showing on the outside of the diaper. The diaper, is, after all, reversible, so I need both sides to look pretty. My solution was to trace a template for the inside of the diaper. This piece lines up with the diaper so that it uses the same seam lines. To save space, I did not use the wings.

Next, comes the tracing the pattern onto the fabric. For each diaper, I needed 2 outer pieces, 1 inner piece, and 5 rectangles for the soaker pad. The completed diaper will be 8 layers thick on the soaker pad, which is, to my knowledge, standard. If I had not done the inside liner I would have made 6-layer soaker pads. The inside pieces can be cut from re-purposed and ugly fabrics because no one will see them! All layers are cut from flannel. Each piece of fabric was folded in half so I could cut 2 pieces at a time. For the outer and inner diaper pieces, it is important to remember to cut about 1/2" out from the seam line. I cut on the line for the soaker pads, and for the cloth wipes. I traced 8" squares for the wipes. This is the wrong side of the fabric, so you can use pencil or pen for tracing.


Once the pieces were all traced and cut, I assembled the soaker pads by stacking 5 rectangles and serging around the perimeter. Next, I sewed the soaker pad to the inner liner.
Then, stack all the layers of the diaper together as pictured below. Outer fabrics go wrong sides together, then lay the liner with sewn-on soaker pad on top, and pin all the layers in place. When you traced the pattern, you drew the seam lines. If you cut in layers, like I did, then only half of your pieces have penciled-in seam lines, so think about this when you are matching front to back. I wanted my diapers to work for either a girl or a boy, so I did one gender-specific fabric and one gender-neutral fabric (or one girly, one boyish) for each diaper.


Next, sew along the seam line, leaving the diaper open at the top for turning. Mark your spots for the leg elastic using the original pattern and apply the elastic. Rita has 2 methods on her blog for applying the elastic. I used a 3-point zigzag to stitch it into the seam allowance. I did the first diaper to completion before doing the rest in an assembly-line fashion. I did this to discover any issues. I applied the elastic BEFORE trimming the seam allowance. Don't do this. It was very difficult to trim once the elastic was added. On your diapers, trim the seam allowance to 1/8", leaving 3/8" where the leg elastic will go, and leave the top opening untrimmed. This will make turning and topstitching much easier.

Now, turn your diaper, and topstitch around the edge. Topstitch about 1/8" from the edge, but on the elastic stitch inside of the elastic so that you are forming a casing. This is why it is important to have the seam allowance trimmed so that it will not catch in the topstitching.
For the wipes, stitch right sides together with a 1/4" seam allowance, leaving an opening for turning. Trim corners, turn, and topstitch.

Look at my pretty diapers! I made a set of 24. they can be made to fit a small baby by folding down the front and the back, and they can be secured either with a single diaper pin or with a snappi. Once I have a baby, I will let you know how well they fit a newborn. I have complete confidence they will fit 3 months and up!

Thursday, September 6, 2012
My adoption journey!
So, I admittedly have not been keeping up with my blog. Expect that to change. I will be posting all sorts of crafts, recipes, and projects, as well as updates on my adoption journey.
Here is the shorter version (really) of my journey:
In April of 2008, I decided that God was calling me to be a foster parent and possibly adopt. I applied through CPS in Houston, and learned that since I was moving to Bryan, I would need to get certified through that branch rather than continue on with the process in Houston. So I did. I drove from Houston to Brenham for the classes and then had all the various inspections and homestudy once I moved to Bryan. There were roadblocks and delays and discouragement but I pushed through. I became very ill and thought I had cancer and spent several weeks in and out of urgent care until my insurance through my new job kicked in and I started seeing a urologist 80 miles away. Well, I did not have cancer but I found out on December 9 that I did have interstitial cystitis. I had so much faith that CPS would approve me as a foster/adoptive parent, but after waiting 2 months after my homestudy for an answer, I got a phone call from CPS one week before Christmas that they were not approving me based on financial reasons. I was working at a daycare after quitting my teaching job and based on my income and my length of time at my current job they denied me.
I was devastated but I did not give up. I spent several months praying and looking at adoption agencies. I kept asking God what I needed to do, and I wasn't getting an answer. I did not have peace about any of the agencies I looked at, none of them felt right. Then, major problems occurred at work and I started feeling it was time to move on, so I started looking at jobs in other fields, and applied for several. Let's be clear about one thing: I was never, I repeat, never going to go back to school. People suggested it. Nope, not going to happen. I continued like this for a few months until one Thursday in May, when I was at work, asking God for the one thousandth time what I was supposed to do, when He told me to go to nursing school. Within an hour I was walking to Blinn (both my job at the time and Blinn College were within walking distance of my apartment) to figure out how to enroll in classes, which were to begin in 6 days. Basically, I only had Friday, a day on which I was, of course, working, to get my college transcript to Blinn so I could be enrolled as a student to register for classes that Sunday. I don't remember how I did it, but I did, and I did not know my ID number, which was necessary to register, and I don't know how I retrieved it, because all the offices were closed.
School was hard. I didn't have any money to start with and was barely making ends meet, now I increased my expenses, and cut my hours at work by 25%. For 6 weeks, I actually worked 48 hours a week between the daycare, a morning babysitting job, and my evening babysitting job, all the while spending 18 hours a week in class and still having to find time to study. I needed A's to get into nursing school, but I was so pressed for time that I did the minimum amount of work that would get me an A in each class. I could not spend 10 minutes on essay bonus questions on a test or do highly elaborate extra credit projects. I needed that time for studying for my next class. I got into nursing school, with all the huge papers and long clinical days. I eventually quit the daycare and began working at Joann Fabrics & Crafts and subbing in the local schools. For at least one semester, I worked every single day that I wasn't in school, including weekends.
Graduation came and it took me 2 months to get a job. I should mention that after SO MUCH WAITING, I really thought God was going to give me a baby right away when I finished school. I mean, I was ready for a baby 3 years ago and I was not exactly happy about God telling me I needed to spend 2.5 years in school first. I graduated in December 2011, so by March of 2011 I was waiting every day for that phone call. The call that someone I know knew of a baby in need of a home.
In the summer, around July, I got that call. My friend Kristina had a friend who was looking for a home for her baby and who didn't want to do an agency adoption, just a lawyer. Wow, that was exactly what I wanted! So Kristina gave her my number. I never heard from her. I later found out that she was considering an abortion. Kristina tried to reach out to her and talk to her but the girl wouldn't talk to Kristina. I kept praying, and praying, and praying that this woman would love her child enough to give him/her life. I don't know what the outcome was. I didn't want to ask. I don't want to be told that the child I loved and wanted and prayed for and set up a nursery for and made cloth diapers for was aborted. I assume that is what happened, but if I don't actually know, then I can believe that maybe, just maybe, she decided to parent her child.
Basically, up to this point, I have believed that God has a specific child out there just for me, and that I would find this child and do an adoption with just a homestudy and a lawyer. In the past week, God led me to once again explore agencies. Over the years I have looked into agency adoption many times but always felt that it was not the right path for me. Well, it turns out that it was the right path but not the right time, and the right time is now. I very easily decided on an agency and I have so much peace about this decision. And because I know this is what God is calling me to, all the fear is gone, and all the worry about how to finance an adoption is gone. So I put a "donate" button on my blog, opened an etsy shop (etsy.com/shop/lizmeslittles), and have begun to go through my stuff to find what can be sold on Amazon or craigslist and have brainstormed ideas of things to make to sell on etsy. In addition, I will be having an ongoing "virtual" bakesale so if you would like to purchase any baked goods such as cakes or cookies, let me know! I also will be passing out baby bottles to anyone willing to collect their spare change into one.
Sunday, January 1, 2012
Scrappy Yo-Yo quilt
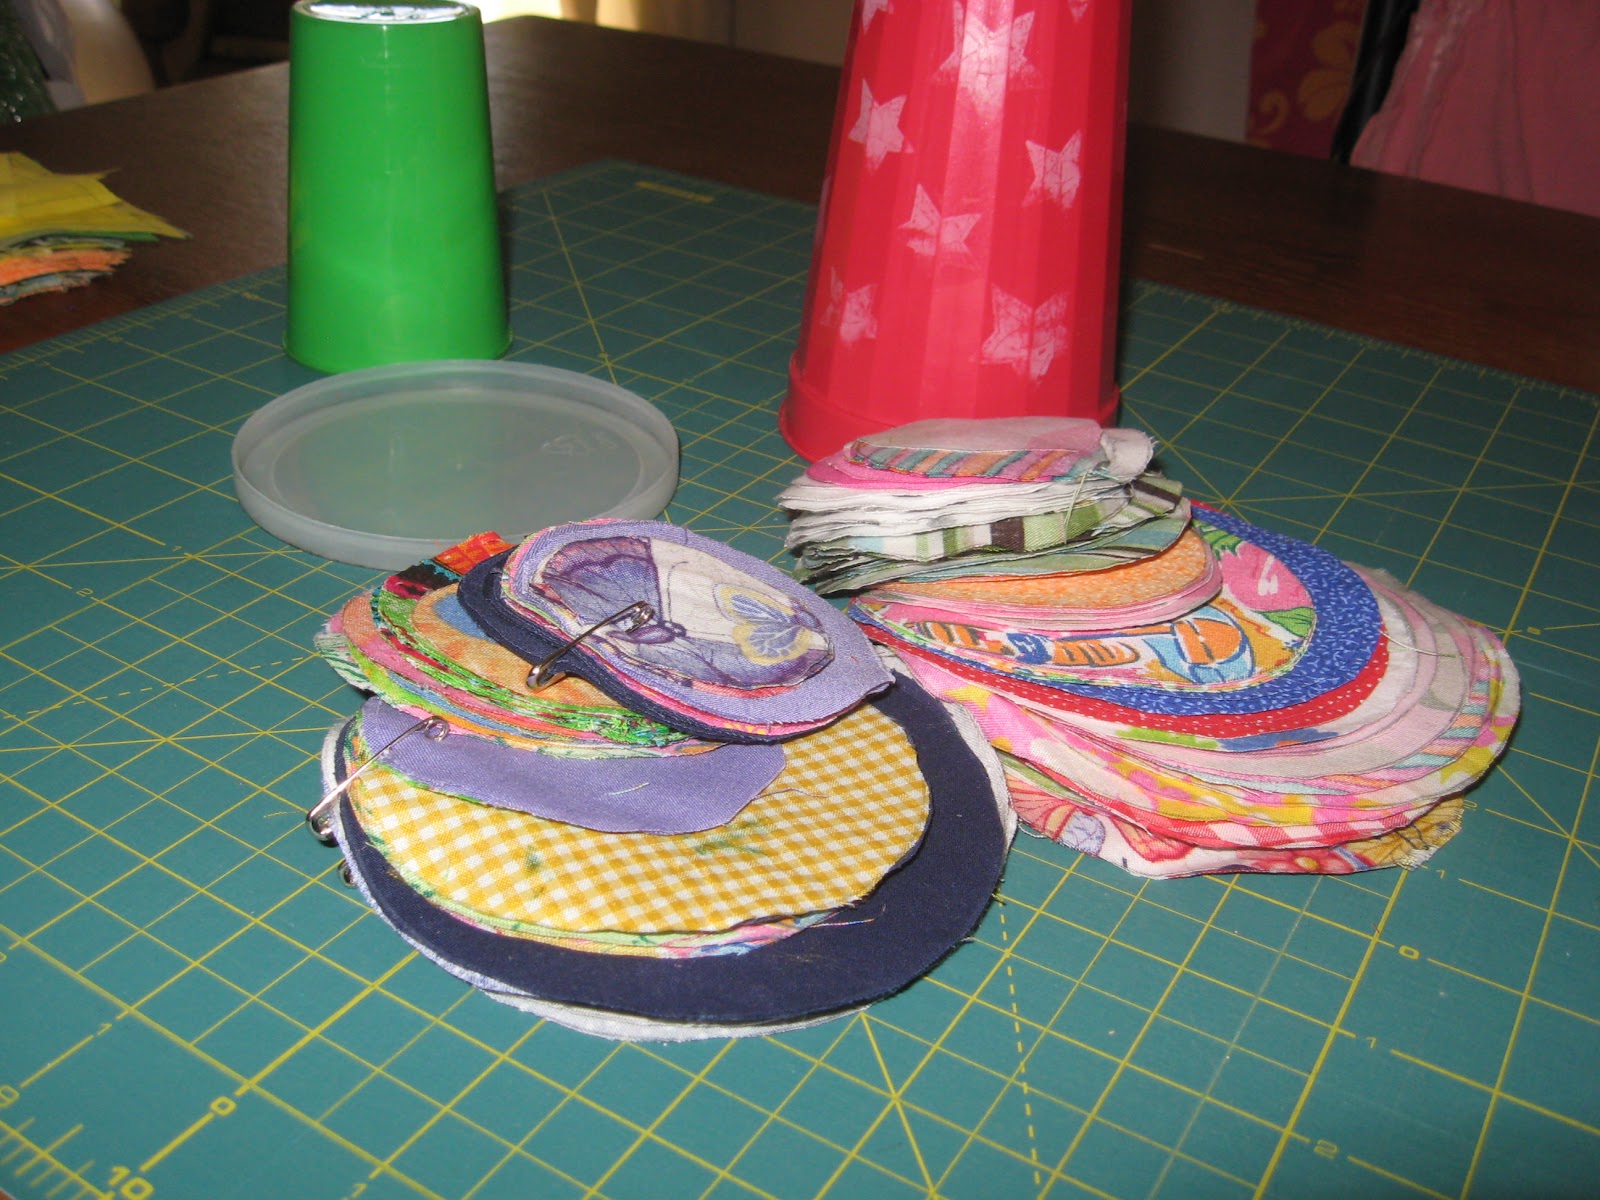
My latest project is a scrappy yo-yo quilt. I plan on doing this entirely by hand. I have been cutting out circles and squares and over Christmas weekend I got some blocks completed.
I am utilizing scrap fabrics for both the squares and the yo-yos. For the squares, I am cutting out 3.5" squares for a finished size of 3". I am penciling in the seam lines so that I can hand-piece the quilt top.
For the yo-yos, I am cutting out circles in 4 different sizes. I am using cups and lids for templates to trace the circles onto the fabric to be cut out. (Let me add that I have never been one to use commercially-made fabric-marking utensils. I use a plain ol' #2 pencil and for dark fabrics I use a white map pencil.)
I apologize, but I don't feel like making an actual tutorial for yo-yo making. It is very simple and there are a ton of great tutorials on the web. Some points to remember are to use a strong thread (I am using hand-quilting thread), and to make sure it is well-secured since it is going on a quilt where it should stay for many, many years.
I then attach the completed yo-yos to the fabric squares. I center the yo-yo on the square, and using a hand-quilting thread (it is a heavier thread and I like the look of it), stitch it down close to the edge. If you desire, you could instead use a blind-stitch applique method, but I really like the way it looks to do it my way.
 |
| Some of my circles. |
 |
| A few squares. |

 |
| Some of the completed blocks. |
Friday, September 16, 2011
C's quilt


Tuesday, August 30, 2011
3 quilts done!
I have finished my 3 quilts of the summer. I have a Singer home sewing machine and I have done straight quilting with a walking foot and free-motion quilting with a darning foot, and have done queen-sized quilts with no problem. Once I learned how to free-motion, I have not done any straight quilting because free-motion is so much more fun and I want to become really good at it! The point of this post is to review my thread choices. Now, I have not experimented with very many threads at this point. With these 3 quilts, I used Gutterman (spelling?) all-purpose and Coats all-purpose threads to do high-speed free-motion quilting. Now, the Coats thread does create a lot of dust, so I make a point to dust about every 5th bobbin change. I also had a partial spool of a Coats variegated quilting thread that worked well. It has been a while since I have done free-motion quilting so I don't remember how well some threads worked that I used previously. For my 3rd quilt this summer, I had a spool of Sulky Blendables quilting thread. I forked up about $5/spool + shipping charges for 2 more spools so I would have enough. This thread looks nice on the quilt, but I found that it was frequently breaking at the high speeds of free-motion quilting. It was a disappointment. For my next quilt, I might branch out and try new threads, or I might use the plain and simple Coats, which is what I have most often used in the past. For now, though, I am taking a break from the quilts to make some bedskirts and pillow shams for my aunts. My cousin needs shams and a bedskirt to match his new Aggie quilt!
In the meantime, I will be busy tackling my last semester of nursing school! Pictures of my latest projects soon to come.
In the meantime, I will be busy tackling my last semester of nursing school! Pictures of my latest projects soon to come.
Wednesday, August 17, 2011
Homemade Coffee Creamer
My aunt bought some coffee creamer at HEB, I think it was Coffee Mate All-Natural Vanilla. Don't quote me on the name, I am not sure it is correct. But it was something along those lines. It was yummy, and I was inspired to make my own. It turned out well, and I just made a second batch to freeze for later. Here is my recipe:
1/4 cup raw cane sugar (I used Sugar in the Raw brand. Raw cane sugar is better for you than processed granulated sugar, and it has a better flavor.)
3/4 cup heavy cream
1 cup milk (I use 2% but skim would work fine)
1 TBSP vanilla (I use the real stuff, not the imitation. It makes a big difference.)
Mix this all together in a one-pint jar, and you are done! The sugar WILL dissolve into the mixture. I was not sure at first if it would completely dissolve in something that cold, but give it a little bit of time and it will. Shake before using (just the same as you would with a store-bought creamer), and ENJOY!
Thursday, May 19, 2011
Mac & Cheese Pie
I just wanted to take this moment to share with you a great recipe that I am planning on making sometime this weekend. I made it last year, and being just one person, I froze individual slices of the pie and I would take it for lunch every day. It made a very large pie, and this time I plan on dividing it between 2 pie plates.
I will start by saying that I got the idea from an issue of Kraft Food & Family (winter 2007), and made serious modifications to suit my diet and lifestyle. As you may or may not know, I am on the IC diet, and though my college-student financial status has primary influence on my eating habits, I strive to make my own food when possible and to follow the diet to reduce symptoms.
So, here is the original version published in Food & Family:
1 pkg Kraft Deluxe Macaroni & Cheese Dinner
2 cups small broccoli florets
4 eggs
1 pkg Oscar Mayer Smoked Ham or Honey Ham, chopped
1/2 cup Kraft Shredded Cheddar & Monterey Jack Cheese
Preheat oven to 350 degrees. Spray 9-inch pie plate with cooking spray. Cook pasta in boiling water until tender, adding broccoli during the last 2 min. of cooking time; drain.
Meanwhile, beat eggs in bowl. Stir in cheese sauce and ham until well blended. Pour egg mixture over pasta, stir to combine.
Spoon into prepared pie plate. Sprinkle with cheese. Bake 30 min. or until set and golden brown.
Makes 6 servings.
Now, here is MY (better) version:
1 box whole-wheat elbow macaroni (usually about 13 oz)
2 cups broccoli florets (fresh or frozen)
4 eggs
4-6 oz of whatever meat you prefer or have on hand (a good way to incorporate leftovers. I sliced up some sausage last time, this time I plan on using ground beef)
about 6 oz of cheese. (I buy the 16 oz blocks of cheese because it is more cost-effective, and I shred it myself. So, for this I just cut off a hunk a little less than 2/3 of the block. You can use cheddar, colby jack, monterey jack, etc.)
Preheat oven to 350 degrees and grease your pie pan (I used a large pie pan and it was piled twice as high as the pan. It can very easily be put into 2 pans). Boil the pasta until tender, and add the broccoli for the last 2 minutes of boiling. Drain.
While pasta is cooking, shred the cheese. Beat the eggs. Add the meat and about 2/3 of the shredded cheese to the eggs and stir together. Add the egg mixture to the pasta mixture and stir. Spoon the mixture into the pie pan(s) and sprinkle with the remaining cheese (you may want to use extra cheese if using 2 pie pans), and bake for 30 minutes.
Let me know how yours turns out :-).
Wednesday, May 11, 2011
Summer!
I just finished my 4th semester of nursing school and I get the summer off before my final semester in the Fall. It has been so long since I have had a summer that I scarcely know what to do with myself. Well, it will be filled with sewing, quilting, crocheting, cooking, and reading. Yes, reading. On Monday, I took my last 2 finals, and when I was getting ready for bed that night, I realized that it is summer and I can read again. See, I had started getting into reading again, but I wouldn't let myself start another book so close to finals. So now I can read, and the great dilemma is WHAT to read.
I ended up choosing Multiple Bles8ings by the Gosselins. I have been wanting to read it for quite some time now, and I actually got a copy at Dollar Tree. I guess it was no longer a best seller after the divorce. It makes me so sad. But I am watching the show right now, and I just started the book, and I am going to let myself pretend that they still are happy and in love, even though we all know different.
 |
| Newly acquired books that I am eager to read. I have read Redeeming Love once before, but it was several years ago. |
 |
| My mom gave me the Anne of Green Gables boxed set several years ago but I have never gotten around to reading them. |
 |
| I did get halfway through LOTR one time. It took me a year. But I was very out-of-practice in reading. You know what they say, "use it or lose it!" So, I have ambitions to read The Hobbit and LOTR. |
 | |||||
| Another set my mom gave me hoping I would read them. She read a couple of these books to us when we were growing up. I will read them, eventually. Really, though, pioneer days are like a magic world to me, so these will definitely get read! |
Tuesday, May 10, 2011
Mary Jane baby booties

Sunday, May 1, 2011
Mousse-Pudding
So, my friend Leslie told me about a dessert she makes. What I love about this recipe is that it is very versatile. She makes a carb-free, low-calorie version but I made an IC-safe version. And it is oh so delicious!
Ingredients:
1 box instant pudding mix
1 cup heavy whipping cream
1 cup milk (or water, or half-and-half, etc.)
4 oz cream cheese, softened (or mascarpone or neufchatel)
Mix it all together using a hand mixer or whisk, and enjoy!
I made mine with regular vanilla pudding mix, milk and regular cream cheese. Leslie makes hers with water and mascarpone cheese, and sugar-free lemon pudding mix. Depending on what diet you are on and how many calories you want it to have, you can adjust it accordingly. And it is just as delectable as she claims!
Friday, April 29, 2011
Under Construction
Check back soon as I will post on my adventures! This summer, stay tuned for cooking and crocheting classes!
Subscribe to:
Posts (Atom)