
Saturday, December 8, 2012
Yo-yo quilt 1 year update
Wednesday, October 24, 2012
Today my adoption coordinator called so that we could talk about my home study. It was so good to talk to her for the first time and I asked a lot of questions and got a lot of information and feel better informed about the information I need to provide. The home study toolkit is a 15-page document full of information, checklists for the documents I need to provide, etc, but the person who emailed it to me told me that I would need to speak with my adoption coordinator before filling it out because there were things I needed to know about the form. Which, of course, turned out to be true, such as when listing my employment history, I need to explain any gap in employment for one month or longer. Good to know, because I had lots of gaps during both times that I was in college.
I also discussed with her that I had been denied by CPS in 2008, and the reasons that they cited for denying me. She double-checked with the home study coordinator and confirmed that those reasons would not affect my home study with them. While we were talking I learned that going through an agency is a whole lot easier than CPS! My fears and hesitancies are now resolved. They are not nearly as nitpicky and do not require so much stuff! I have a fire and environmental checklist that my home has to meet, but there won't be health inspections and fire inspections, etc. CPS was a whole lot of work. I still have to provide a lot of the same documents that I provided to CPS but there are a lot of roadblocks with CPS that are not roadblocks with my agency.
So what has to happen now is that I have to gather all the documents for my home study file, and as soon as that is done and they have the results of my background check, it will be only a couple of days before the home study coordinator will contact me to schedule my home visit. Then it is straight on to the matching process!
I do need to find somewhere to store my desktop computer and desk while I am still living in the apartment. I am planning to move into a house when my lease is up in July, but for now the computer desk is blocking the window in my bedroom, and the fire safety requirements dictate that the window not be blocked. So if anyone wants to let me stash it in their house or in their garage until next summer, let me know! I also have to make a Last Will & Testament. I think those 2 things, the computer desk and the will, are going to be the biggest things to get done. Everything else should be pretty simple and pretty easy.
Now let me tell you what my dog, Fiyero, did while I was at work yesterday. You know how I posted a pic of the baby bottles to collect change in? Well, every day when I am gone, my dog opens the door to the baby room. I don't know what he does in there, I usually can't find anything wrong. Well yesterday, I found something. I had set all of those baby bottles, in the package, on the bed. Just so you know, the room is full of boxes of stuff for my garage sale and some of those boxes are blocking the bed. So I don't know how he did it, but all of the bottles were out of the package and they were all still on the bed. The actual bottles were intact, but the nipple rings had been removed from every bottle and were well-chewed. There is no sign of the silicone nipples. We are talking 7 bottles. The bottles were not chewed. There was not a single bottle that still had the nipple ring on, and not a single nipple ring was unchewed. And no nipples, not even pieces. 7 silicone nipples were removed from the nipple rings and disappeared without a trace. Impressive, I know. No one can ever say that Fiyero is not thorough!
Monday, October 15, 2012
I'm on my way!
So, I called Children's Connections, Inc. today to see if they received my adoption application. They just got it today although I mailed it a week and a half ago. Apparently Lubbock is in a different country! Anyway, I am so excited. They don't call it an application, they apparently call it a "service initiation agreement" so when I called to ask if they received my application they transferred me to HR thinking I was talking about a job application. So that was a little confusing. But they did receive my service initiation agreement today, and then sent me an email with some more information.
I am learning that the average person does not understand the adoption process very well. There is a lot that happens before you are matched with a baby. The requirements vary somewhat among agencies, but you have to apply with the agency and undergo a background check. A homestudy is required for all adoptions in Texas. What is a homestudy? Well, a social worker comes to your home and interviews you in depth about everything. Your home life, your finances, your childhood, your plans for the future, your relationships with your family and friends, your health, etc. This includes financial documents, budgets, debts and assets. Depending on the agency you are using, you may have to attend counseling sessions, take classes, have health and fire inspections of your home, provide letters from your doctor, etc. Once you complete all the requirements and have an approved home study, you wait to be matched, which can still take some time.
I am so excited. I already am assigned to an adoption coordinator, who should be getting in touch with me in the next couple of days, and I received another email with my home study toolkit. So now I am going to read through that! Yay!
Saturday, October 6, 2012
Scentsy, etsy, and more!
Well, this week I mailed off my adoption application with my first payment!!! I am so excited that I can hardly believe it's real. Now I will be going into full-fundraiser mode, doing paperwork, preparing for my homestudy, etc.
I am doing a Scentsy & Grace Adele fundraiser, which goes through Oct. 27th. You can order from my Scentsy party online here and as soon as I have a link for the Grace Adele party, I will post it.
I am also doing a garage sale to raise funds for my adoption on Nov. 3rd here in Bryan/College Station. If you live around here or in Houston and would like to donate your junk for me to sell, please let me know! The only way this will be a success is if I have a lot of stuff to sell. Also, if you would like to help with the sale that weekend that would be greatly appreciated! (And I have decided to bribe helpers with chocolate chip cookies.)
I do have an etsy store and am working to make more things to post for sale. Right now it is mostly stethoscope covers. I am working on hats, scarves, holiday placemat & napkin sets, and crocheted toys, all in time for Christmas, so check for updates.
In the meantime, help me spread the word and gain support for my adoption!
Thanks and gig 'em!
~Elizabeth
Saturday, September 22, 2012
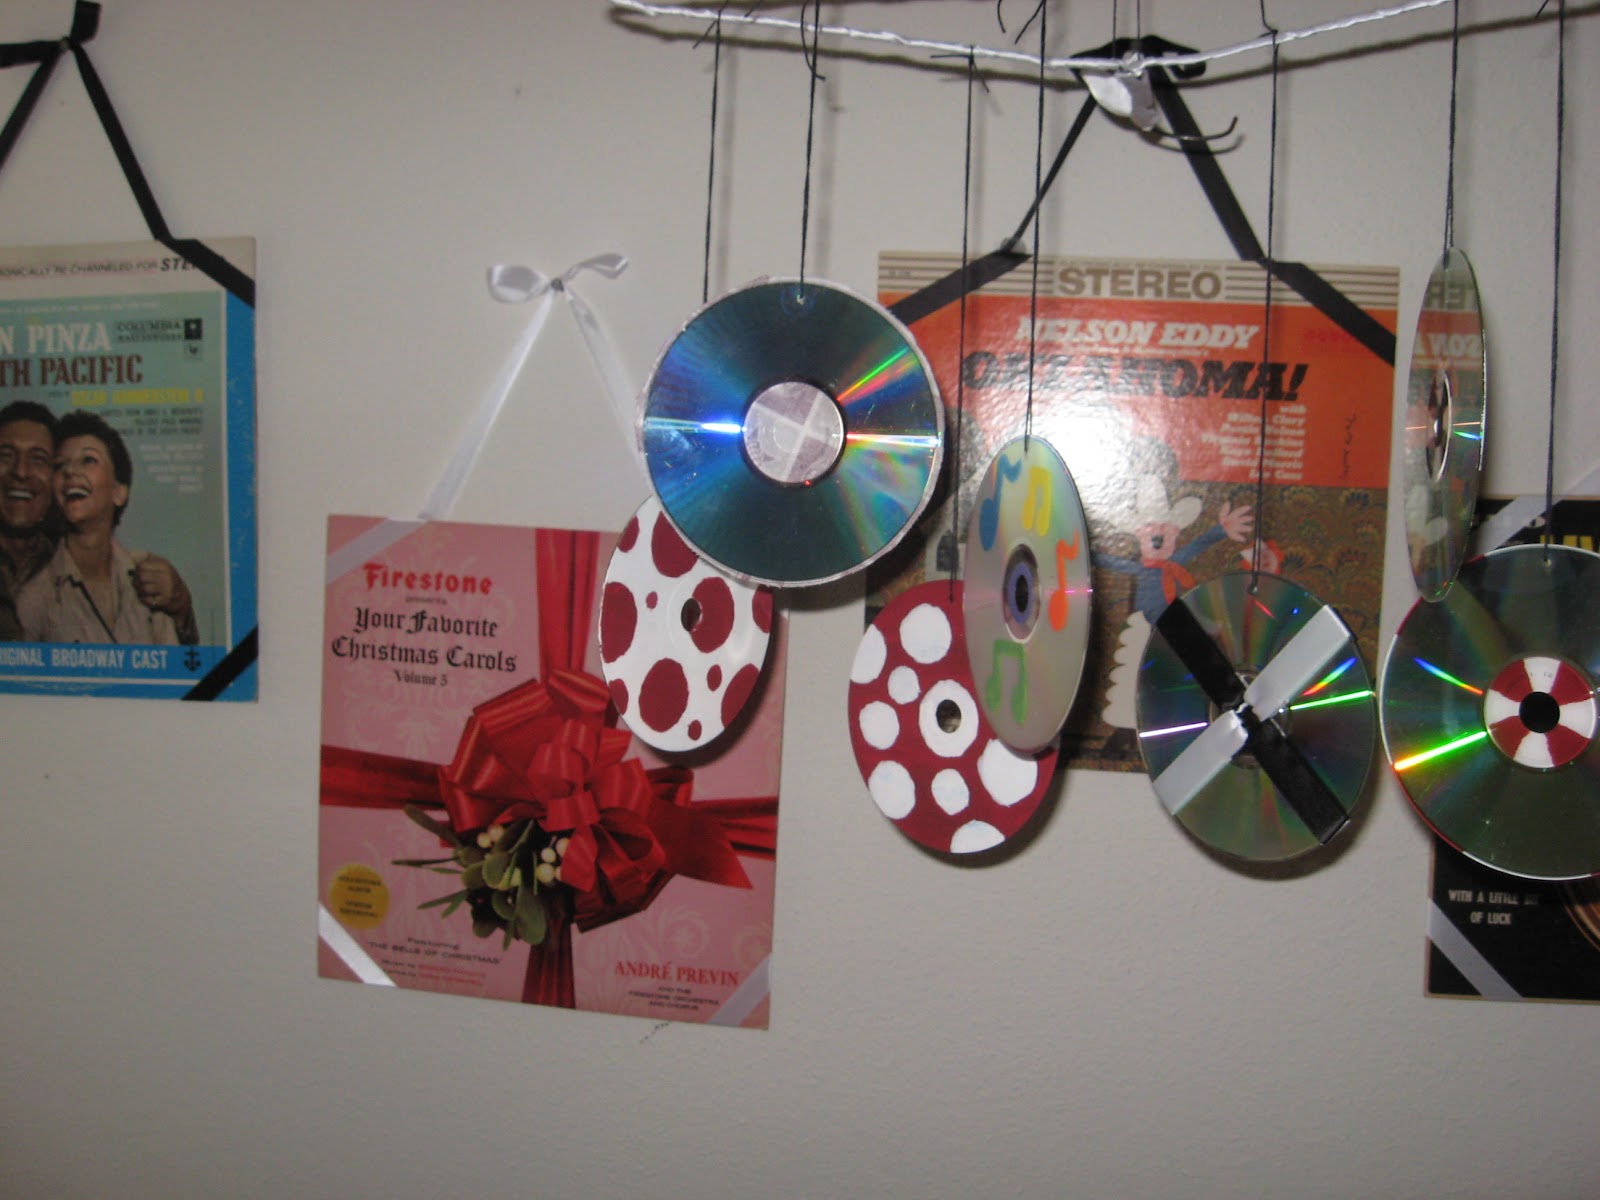
DVD Mobile
Last year for Christmas, I converted all of our family's home movies to DVD. Twenty-something years worth of home movies translated into 50 DVDs, and I made a set for my parents, myself, and each of my 3 siblings, which totaled 250 discs. (If you want to do this, buy a little device on Amazon called easyCAP. It is dirt cheap, around $8, but you will have to read the reviews in order to learn how to use it because the instructions that come with it are worthless. You will notice that more than half of the reviews are horrible; those reviews are from the people who did not read the other reviews and thus could not work it. Read the good reviews from the computer gurus, it will be well-worth your time. Once you figure it out, it is super easy to use! One review said it did not work on Windows 7 64-bit, but that is what I have and it worked swell! You do need a lot of space on your hard drive for the capturing, it uses about 1 GB/minute of video for the capturing, but once you save it as a movie through Windows Movie Maker, it will only be 3-4 GB, and then you can delete the raw footage.)
If you have ever burned a DVD, you know that errors sometimes occur and render the DVD unplayable. If you are making 250 DVDs, you end up with a whole lot of unusable discs. I have a hard time throwing away something if I think I can come up with a use for it. We all have plenty of coasters made out of nonworking discs, and I have quite a collection of coasters as it is, so I needed something different. The internet was not much help. Yes, if you google it, you will find all sorts of creative and elaborate uses for old discs, but none of these ideas appealed to me, except there were many mobiles pictured. None of the mobiles were my style, but nevertheless I decided to brainstorm a mobile that would be my style!

The result is my baby mobile. I decorated the discs in various ways, and had my friends decorate a few, too. High-contrast is very stimulating to babies, so several of the discs are painted black & white or maroon & white (we have to begin instilling the Aggie spirit at an early age!). I glued squares of black & white fabrics on some of the discs. Babies are also stimulated by bright colors, and my nursery's theme is "music & musicals," so some of the discs are painted with music notes in bright colors. The reflections of light off of the discs is also stimulating so the backs are left blank, and I have a few discs that I glued together so that the shiny sides are facing out, and I added ribbon to these.

The next step is to drill a hole near the edge of each disc for hanging. I used cotton crochet thread to tie the discs to a hanger (for lack of anything better to use and for the purpose of being economical). I then tied the hanger at three points so that it could be hung from a hook on the ceiling. I have it hanging over my changing table, and, in my opinion, it looks spectacular. When the fan is on, the air turns the discs and creates a nice effect. I have additional discs that I am going to use on a play gym that I got secondhand and all the toys are missing. They will be too high to touch but stimulating to look at and reach for. I am sure I will come up with more uses before all is said and done.
Friday, September 21, 2012
Update & Fundraisers
Wow, sorry I haven't posted in a while! I have been picking up an extra shift each week so I can make money for my adoption! I am very excited, but all the working is keeping me super busy and not giving me much time to rest. At least I have a good reason for doing it :-).
I am working on going through all my stuff to get ready for an adoption fundraiser garage sale. I live in an apartment, so if anyone would be willing to let me have my garage sale at your house, let me know! I have an offer to use a friend's house in Houston, but that is a little far for hauling stuff and setting up the day before, etc. I also am accepting donations of stuff to sell, as well as help to get everything set up and priced and help running the garage sale.
The other fundraiser I am doing is collecting change. To anyone who would like to collect their change for me, I will give you a cute decorated baby bottle that says, "Baby Bossert adoption fund" for you to collect your change in!
If you would like to be a part, but live far away, some ideas of how you could help are:
1. Donate through my blog
2. Have a garage sale on my behalf and donate the money
3. Sell your junk online and donate the money
4. Pray!
I really appreciate everyone who is supporting me in this endeavor!
I am going to get some sleep now because I have to be up at 4 for work, yikes.
Thanks and gig 'em!!!
Elizabeth

Friday, September 7, 2012
Cloth diapers

For my cloth diaper stash, I am making fitteds, flats, and prefolds. I completed the fitteds a few months ago and thought I would share them with you. The diapers I made are "one size fits most," and I used Rita's Rump Pocket as the basis and got some of my inspiration from a one-size-fits-all fitted diaper pattern that I can no longer find online (the site no longer exists). Rita's website shows her pocket diaper on both a 3-month old and a 2.5-year old. One of her suggestions is to make the diaper with a sewn-in insert, and since the other one-size pattern I found has even more layers but claims to fit a newborn, I decided to go for it.

I printed off her pattern, enlarged to the correct size, and taped it together. From reading Rita's blog, I learned that the front wings cause problems with wing droop, and she suggests folding in the wings on the completed diaper. I decided to fold in the wings on the pattern, thus eliminating front wings from the completed diaper, especially since they are not important to the fit of the diaper. I traced a rectangle onto cardstock to use as a template for the sewn-in insert. The cardstock square you see is a template I made a long time ago, the center is an 8" square and the outside is a 12" square. I used the 8" square for my cloth wipes.

And then I wondered how to do a sewn-in insert without the stitching showing on the outside of the diaper. The diaper, is, after all, reversible, so I need both sides to look pretty. My solution was to trace a template for the inside of the diaper. This piece lines up with the diaper so that it uses the same seam lines. To save space, I did not use the wings.

Next, comes the tracing the pattern onto the fabric. For each diaper, I needed 2 outer pieces, 1 inner piece, and 5 rectangles for the soaker pad. The completed diaper will be 8 layers thick on the soaker pad, which is, to my knowledge, standard. If I had not done the inside liner I would have made 6-layer soaker pads. The inside pieces can be cut from re-purposed and ugly fabrics because no one will see them! All layers are cut from flannel. Each piece of fabric was folded in half so I could cut 2 pieces at a time. For the outer and inner diaper pieces, it is important to remember to cut about 1/2" out from the seam line. I cut on the line for the soaker pads, and for the cloth wipes. I traced 8" squares for the wipes. This is the wrong side of the fabric, so you can use pencil or pen for tracing.


Once the pieces were all traced and cut, I assembled the soaker pads by stacking 5 rectangles and serging around the perimeter. Next, I sewed the soaker pad to the inner liner.
Then, stack all the layers of the diaper together as pictured below. Outer fabrics go wrong sides together, then lay the liner with sewn-on soaker pad on top, and pin all the layers in place. When you traced the pattern, you drew the seam lines. If you cut in layers, like I did, then only half of your pieces have penciled-in seam lines, so think about this when you are matching front to back. I wanted my diapers to work for either a girl or a boy, so I did one gender-specific fabric and one gender-neutral fabric (or one girly, one boyish) for each diaper.


Next, sew along the seam line, leaving the diaper open at the top for turning. Mark your spots for the leg elastic using the original pattern and apply the elastic. Rita has 2 methods on her blog for applying the elastic. I used a 3-point zigzag to stitch it into the seam allowance. I did the first diaper to completion before doing the rest in an assembly-line fashion. I did this to discover any issues. I applied the elastic BEFORE trimming the seam allowance. Don't do this. It was very difficult to trim once the elastic was added. On your diapers, trim the seam allowance to 1/8", leaving 3/8" where the leg elastic will go, and leave the top opening untrimmed. This will make turning and topstitching much easier.

Now, turn your diaper, and topstitch around the edge. Topstitch about 1/8" from the edge, but on the elastic stitch inside of the elastic so that you are forming a casing. This is why it is important to have the seam allowance trimmed so that it will not catch in the topstitching.
For the wipes, stitch right sides together with a 1/4" seam allowance, leaving an opening for turning. Trim corners, turn, and topstitch.

Look at my pretty diapers! I made a set of 24. they can be made to fit a small baby by folding down the front and the back, and they can be secured either with a single diaper pin or with a snappi. Once I have a baby, I will let you know how well they fit a newborn. I have complete confidence they will fit 3 months and up!

Thursday, September 6, 2012
My adoption journey!
So, I admittedly have not been keeping up with my blog. Expect that to change. I will be posting all sorts of crafts, recipes, and projects, as well as updates on my adoption journey.
Here is the shorter version (really) of my journey:
In April of 2008, I decided that God was calling me to be a foster parent and possibly adopt. I applied through CPS in Houston, and learned that since I was moving to Bryan, I would need to get certified through that branch rather than continue on with the process in Houston. So I did. I drove from Houston to Brenham for the classes and then had all the various inspections and homestudy once I moved to Bryan. There were roadblocks and delays and discouragement but I pushed through. I became very ill and thought I had cancer and spent several weeks in and out of urgent care until my insurance through my new job kicked in and I started seeing a urologist 80 miles away. Well, I did not have cancer but I found out on December 9 that I did have interstitial cystitis. I had so much faith that CPS would approve me as a foster/adoptive parent, but after waiting 2 months after my homestudy for an answer, I got a phone call from CPS one week before Christmas that they were not approving me based on financial reasons. I was working at a daycare after quitting my teaching job and based on my income and my length of time at my current job they denied me.
I was devastated but I did not give up. I spent several months praying and looking at adoption agencies. I kept asking God what I needed to do, and I wasn't getting an answer. I did not have peace about any of the agencies I looked at, none of them felt right. Then, major problems occurred at work and I started feeling it was time to move on, so I started looking at jobs in other fields, and applied for several. Let's be clear about one thing: I was never, I repeat, never going to go back to school. People suggested it. Nope, not going to happen. I continued like this for a few months until one Thursday in May, when I was at work, asking God for the one thousandth time what I was supposed to do, when He told me to go to nursing school. Within an hour I was walking to Blinn (both my job at the time and Blinn College were within walking distance of my apartment) to figure out how to enroll in classes, which were to begin in 6 days. Basically, I only had Friday, a day on which I was, of course, working, to get my college transcript to Blinn so I could be enrolled as a student to register for classes that Sunday. I don't remember how I did it, but I did, and I did not know my ID number, which was necessary to register, and I don't know how I retrieved it, because all the offices were closed.
School was hard. I didn't have any money to start with and was barely making ends meet, now I increased my expenses, and cut my hours at work by 25%. For 6 weeks, I actually worked 48 hours a week between the daycare, a morning babysitting job, and my evening babysitting job, all the while spending 18 hours a week in class and still having to find time to study. I needed A's to get into nursing school, but I was so pressed for time that I did the minimum amount of work that would get me an A in each class. I could not spend 10 minutes on essay bonus questions on a test or do highly elaborate extra credit projects. I needed that time for studying for my next class. I got into nursing school, with all the huge papers and long clinical days. I eventually quit the daycare and began working at Joann Fabrics & Crafts and subbing in the local schools. For at least one semester, I worked every single day that I wasn't in school, including weekends.
Graduation came and it took me 2 months to get a job. I should mention that after SO MUCH WAITING, I really thought God was going to give me a baby right away when I finished school. I mean, I was ready for a baby 3 years ago and I was not exactly happy about God telling me I needed to spend 2.5 years in school first. I graduated in December 2011, so by March of 2011 I was waiting every day for that phone call. The call that someone I know knew of a baby in need of a home.
In the summer, around July, I got that call. My friend Kristina had a friend who was looking for a home for her baby and who didn't want to do an agency adoption, just a lawyer. Wow, that was exactly what I wanted! So Kristina gave her my number. I never heard from her. I later found out that she was considering an abortion. Kristina tried to reach out to her and talk to her but the girl wouldn't talk to Kristina. I kept praying, and praying, and praying that this woman would love her child enough to give him/her life. I don't know what the outcome was. I didn't want to ask. I don't want to be told that the child I loved and wanted and prayed for and set up a nursery for and made cloth diapers for was aborted. I assume that is what happened, but if I don't actually know, then I can believe that maybe, just maybe, she decided to parent her child.
Basically, up to this point, I have believed that God has a specific child out there just for me, and that I would find this child and do an adoption with just a homestudy and a lawyer. In the past week, God led me to once again explore agencies. Over the years I have looked into agency adoption many times but always felt that it was not the right path for me. Well, it turns out that it was the right path but not the right time, and the right time is now. I very easily decided on an agency and I have so much peace about this decision. And because I know this is what God is calling me to, all the fear is gone, and all the worry about how to finance an adoption is gone. So I put a "donate" button on my blog, opened an etsy shop (etsy.com/shop/lizmeslittles), and have begun to go through my stuff to find what can be sold on Amazon or craigslist and have brainstormed ideas of things to make to sell on etsy. In addition, I will be having an ongoing "virtual" bakesale so if you would like to purchase any baked goods such as cakes or cookies, let me know! I also will be passing out baby bottles to anyone willing to collect their spare change into one.
Sunday, January 1, 2012
Scrappy Yo-Yo quilt
My latest project is a scrappy yo-yo quilt. I plan on doing this entirely by hand. I have been cutting out circles and squares and over Christmas weekend I got some blocks completed.
I am utilizing scrap fabrics for both the squares and the yo-yos. For the squares, I am cutting out 3.5" squares for a finished size of 3". I am penciling in the seam lines so that I can hand-piece the quilt top.
For the yo-yos, I am cutting out circles in 4 different sizes. I am using cups and lids for templates to trace the circles onto the fabric to be cut out. (Let me add that I have never been one to use commercially-made fabric-marking utensils. I use a plain ol' #2 pencil and for dark fabrics I use a white map pencil.)
I apologize, but I don't feel like making an actual tutorial for yo-yo making. It is very simple and there are a ton of great tutorials on the web. Some points to remember are to use a strong thread (I am using hand-quilting thread), and to make sure it is well-secured since it is going on a quilt where it should stay for many, many years.
I then attach the completed yo-yos to the fabric squares. I center the yo-yo on the square, and using a hand-quilting thread (it is a heavier thread and I like the look of it), stitch it down close to the edge. If you desire, you could instead use a blind-stitch applique method, but I really like the way it looks to do it my way.

 |
| Some of my circles. |
 |
| A few squares. |

 |
| Some of the completed blocks. |
Subscribe to:
Posts (Atom)